Thursday, February 21, 2019

Windows 10 Product Keys

Windows 10 Product Keys


"Windows 10 Supported Editions"           "Product Keys"

Home/Core                                      TX9XD-98N7V-6WMQ6-BX7FG-H8Q99        

Home/Core (Country Specific)      PVMJN-6DFY6-9CCP6-7BKTT-D3WVR

Home/Core (Single Language)      7HNRX-D7KGG-3K4RQ-4WPJ4-YTDFH            

Home/Core N                                  3KHY7-WNT83-DGQKR-F7HPR-844BM  

Professional                                     W269N-WFGWX-YVC9B-4J6C9-T83GX

Professional N                                 MH37W-N47XK-V7XM9-C7227-GCQG9

Enterprise                                        NPPR9-FWDCX-D2C8J-H872K-2YT43

Enterprise N                                   DPH2V-TTNVB-4X9Q3-TJR4H-KHJW4

Education                                       NW6C2-QMPVW-D7KKK-3GKT6-VCFB2

Education N                                   2WH4N-8QGBV-H22JP-CT43Q-MDWWJ

Enterprise 2015 LTSB                  WNMTR-4C88C-JK8YV-HQ7T2-76DF9

Enterprise 2015 LTSB N             2F77B-TNFGY-69QQF-B8YKP-D69TJ

Enterprise 2016 LTSB                 DCPHK-NFMTC-H88MJ-PFHPY-QJ4BJ
  
Enterprise 2016 LTSB N             QFFDN-GRT3P-VKWWX-X7T3R-8B639

Monday, January 14, 2019

How To Increase Your Internet Speed For FREE | Faster DNS Server

How To Increase Your Internet Speed For FREE | Faster DNS Server

Hi friends... In this article i am going to shows you how to increase internet speed and get fast internet response time by using a open private faster DNS server.

Virtually increase you computer speed when accessing the internet.

Get an increase in your internet speed just by making one simple free DNS server change in your Windows 10/8/7 Operating System.


Try out this faster DNS server free and see how to get fast internet speed for free when you do.

You will comprehend in less then 6 minutes how to increase your internet speed in 1 minute for free.

Steps to Increase Internet Speed for Free :

1st step : Open "Control Panel".

2nd Step : Click on "Network and Internet".

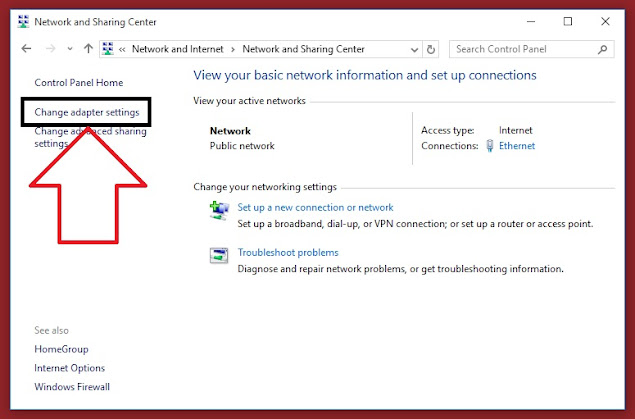
3rd Step : Click on "Network and Sharing Center".

4th Step : Click on "Change Adapter Settings".


5th Step : Now here you need to Right-click on your "Active Internet Connection" (In my case I have Ethernet).


6th Step : First select "Internet Protocol Version 4(IPv4)" and then click on "Properties" button.


7th Step : Now you first need to select "Use the following DNS Server Addresses" box.

> And then type below mention DNS Server Addresses.

> Preferred DNS Server : 1.1.1.1
> Alternate DNS Server : 1.0.0.1

OR

Preferred DNS Server : 8.8.8.8
Alternate DNS Server : 8.8.4.4


Once you done that just "Tick" the "Validate Settings" box & then hit "OK" button to save changes.


Watch Video Tutorial


Thursday, January 3, 2019

How To Fix Windows 10 Store Not Working or Not Downloading Apps Problem | 3 Best Solutions

How To Fix Windows 10 Store Not Working or Not Downloading Apps Problem | 3 Best Solutions


Solution 1 : Open command prompt as administrator and then execute the below mention command...

PowerShell -ExecutionPolicy Unrestricted -Command "& {$manifest = (Get-AppxPackage Microsoft.WindowsStore).InstallLocation + '\AppxManifest.xml' ; Add-AppxPackage -DisableDevelopmentMode -Register $manifest}"


Solution 2 : First open command prompt as administrator, then type "powershell" and then execute the below mention command...

Set-ExecutionPolicy Unrestricted


and then type...

Get-AppXPackage -AllUsers | Foreach {Add-AppxPackage -DisableDevelopmentMode -Register "$($_.InstallLocation)\AppXManifest.xml"}


Solution 3 : Open powershell as administrator and then execute the below mention command...

((Get-ChildItem “HKLM:SOFTWARE\Microsoft\Windows\CurrentVersion\Appx\AppxAllUserStore\InboxApplications”) | Get-ItemProperty).Path | Add-AppxPackage -Register -DisableDevelopmentMode