Sunday, May 20, 2018

How to Remove Write Protection from USB Drive

How to Remove Write Protection from USB Drive

Friend's if you try to paste any thing or format your usb drive or pen drive, then it will prompt you that error message (The disk is write protected).


And you can't paste or format your usb drive... So don't wrong i found two very easy way to fix that error message.

Just Follow below mention steps..

Method 1st:

1st Step : Open Command Prompt (As Admin).

2nd Step : Now here execute below mention commands one by one.

Type command 1 : diskpart and then hit enter key to execute the command.


3rd Step : list disk and then hit enter key to execute the command.


4th Step : select disk 2 and then hit enter key to execute the command.

Note : Here "disk 2" is my usb drive, it may be different disk number in your case, So select
your usb drive disk.


5th Step : detail disk and then hit enter key to execute the command.


Here it says "Read-Only = Yes", We just need to make it "NO".

6th Step : attr disk clear readonly and then hit enter key to execute the command.


 That's the first method, If still getting the same error message ( The disk is write proteced ) then move to 2nd method.

Method 2nd : 

1st Step : Open "RUN", Type "regedit" and then hit "OK".

2nd Step : Expend > HKEY_LOCAL_MACHINE > System > CurrentControlSet > Control.

3rd Step : Double click on "StorageDevicePolicies".

Note : If you can't find "StorageDevicePolicies" under "Control" then first create it, Right-click on "Control", Select "New" and then hit "Key".


Named that created "Key" as "StorageDevicePolicies".

4th Step : Select "StorageDevicePolicies", After that right-click on white area, Select "New", click on "DWORD(32-bit) Value" and then named as "WriteProtect".


5th Step : Double-click on "WriteProtect", Set Value Data to "0" and then hit "OK" button to save changes.


That's it... I hope one of the above method will help you out to fix that error message (The disk is write protected).

Watch Video Tutorial


Thursday, May 17, 2018

You Need Permission to Perform This Action Windows 10 Fix

How to Fix "You Need Permission to Perform This Action" Windows 10

This article is about How to Fix "You Need Permission to Perform This Action" Windows 10 or folder access denied error.


It sometimes happen that when you try to delete or copy any file or folder it prompt you that error message which says "Folder Access Denied".

So i am going to tell you very simple and easy way through which you can solve that "You Need Permission to Perform This Action" problem.

Follow below mention steps to fix "Folder Access Denied" Issue : 


1st Step : Right-click on Folder and then hit "Properties".


2nd Step : Go to "Security" tab.


3rd Step : Click on "Edit" button.


4th Step : Click on "Add" button.


5th Step : Click on "Advanced" button.


6th Step : Click on "Find Now" button.


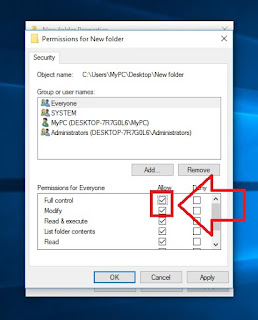
7th Step : Now here select "Everyone" and then click on "OK" button.


8th Step : After that check the "Full Control" box and in the last hit "Apply-Ok" button to save changes.


Once you done all above mention steps correctly, then try again to delete that file or folder which prompt that error message "folder access denied" and this time it will be deleted...

Watch Video Tutorial 


Wednesday, May 16, 2018

How to Speed Up your LAN or Wi-Fi Internet Connection | DNS Server 2018


How to Speed Up your LAN or Wi-Fi Internet Connection | DNS Server 2018

In this article of "How to Speed Up your LAN or Wi-Fi Internet Connection", I will show you very simple and easy way through which you can increase internet speed for free.


Just follow below mention steps :


1st Step : Go to "Network & Sharing Center".


2nd Step : Click on "Change Adapter Settings".


3rd Step : Now here right-click on your active internet connection (In my case i have Ethernet has my active internet connection) & then click on "Properties".


4th Step : First Select "Internet Protocol Version 4 (TCP/IPv4)" and then click on "Properties".


5th Step : Now here first select "Use the following DNS Server Addresses" radio-box and then write below mention ip addresses.
After that set Preferred DNS Server : 8.8.8.8 and Alternate DNS Server : 8.8.4.4


Once you set both DNS Server Addresses, just click on "OK" button to save changes.

Watch Video Tutorial


Sunday, May 13, 2018

[ Solve ] Can't Type in Windows 10 Search Bar | 2 Simple Methods


[Solve] Can't Type in Windows 10 Search Bar | 2 Simple Methods


In this article of "How to Fix Can't Type in Windows 10 Search Bar", I will show you 2 very simple and easy steps through which you can solve this problem in windows 10.


Method 1 : Right-click on "Windows Button" and then select "Command Prompt (Admin)".


Type command :
PowerShell -ExecutionPolicy Unrestricted


And then press "
Enter Key" to execute the command.


After that type command : 
Get-AppXPackage -AllUsers |Where-Object {$_.InstallLocation -like "*SystemApps*"} | Foreach {Add-AppxPackage -DisableDevelopmentMode -Register "$($_.InstallLocation)\AppXManifest.xml"}


And then press "
Enter Key" to execute the command.


Once command execution ends, Try to write something in the search bar, If it is working then OK... Otherwise move to 2nd method.


Method 2 : Go to "Task manager", Click on "File" and then click on "Run New Task".


Now type "
powershell" in the bar and do check "Create this task with administrative privileges" box.


This will open "
Windows PowerShell Interface" in front of you.


Here you just need to execute below mention command.


$manifest = (Get-AppxPackage Microsoft.WindowsStore).InstallLocation + '\AppxManifest.xml' ; Add-AppxPackage -DisableDevelopmentMode -Register $manifest


Press "
Enter Key" to start execution of the command.


Once command execution ends, Just restart your PC/Laptop.

                              Watch Video Tutorial