Sunday, June 20, 2021

How to Quickly Fix Windows 10 Settings Not Opening Problem | 3 Solutions

 How to Quickly Fix Windows 10 Settings Not Opening Problem | 3 Solutions

In this article of "How to Quickly Fix Windows 10 Settings Not Opening Problem", I am going to share 3 simple and quick ways through which you can fix this settings not opening problem in windows 10.


Solutions to Fix Settings Not Opening in Windows 10 are:


Fix 1: Run Windows PowerShell Command.

> Right-click on "Start Button", then click on "Windows PowerShell" as Administrator and then execute the below mention command.


Command is: Get-AppXPackage -AllUsers -Name windows.immersivecontrolpanel | Foreach {Add-AppxPackage -DisableDevelopmentMode -Register “$($_.InstallLocation)\AppXManifest.xml” -Verbose}


> Once command execute successfully, Check windows settings working or not, If not then "Restart" you PC once.

> If this fix does not solve settings not opening problem then apply 2nd fix.


Fix 2: Rebuild All Windows 10 Apps.

> Right-click on "Start Button", then click on "Windows PowerShell" as Administrator and then execute the below mention command.


> Command is: Get-AppXPackage | Foreach {Add-AppxPackage -DisableDevelopmentMode -Register "$($_.InstallLocation)\AppXManifest.xml"}


> Note : You may see few red lines but don't worry and let this commands ends...

> Once command execute successfully, Check windows settings working or not, If not then "Restart" you PC once.


Fix 3: Run System File Checker.

> Search for "Command Prompt", then click on "Run as Administrator" and then execute below mention command.


> Command is: sfc /scannow


> This command will take few minutes, Once the command execute successfully, Check windows settings working or not.

> That's it, I hope one of the above fix will definitely work's for you to fix this windows 10 settings not opening problem.


Monday, June 7, 2021

How to Fix Thumbnails Not Showing on Windows 10 | 5 Working Fix

 How to Fix Thumbnails Not Showing on Windows 10 | 5 Working Fix


In this article "How to Fix Thumbnails Not Showing on Windows 10", I will share 5 best and working solutions through which you can easily fix this thumbnail not showing problem in windows 10.


If you can't see thumbnail of icon's in windows 10 then there are number of reasons behind it which cause windows to not show thumbnail of icon's.

If you are facing same thing of problem then you are at right place because in this article I will share 5 working fix which will definitely help you to solve this issue.

5 SOLUTIONS TO FIX THUMBNAIL NOT SHOWING IN WINDOWS 10 ARE:


Fix 1: File Explorer Options.

> Search for "Folder Options" & then open it, Move to "View" tab and here make sure that "Always Show Icon, Never Thumbnails" is "Un-Checked".

> In the last click on "Apply" and "OK" button's to save the settings.


> If this fix does not work's for you then apply 2nd fix which is.


Fix 2: Restart Windows Explorer.

> Right-click on "Task Bar" and then click on "Task Manager" to open it.


> Here select "Windows Explorer" and then click on "Restart". This will restart windows explorer.


> If this fix still don't work's for you then move to 3rd fix.


Fix 3: Visual Effect Settings.

> Search for "Advanced System Settings" and then open it.


> Click on "Settings" which is present Under "Performance".


> Here select the "Adjust For Best Appearance" option and then click on "Apply" & "OK" button's to save the settings.


> If this fix still don't work's for you then move to 4th fix.


Fix 4: Clear Thumbnail Cache.

> Search for "Dish Cleanup" and then open it.


> Select "Drive C" and then click on "OK" button.


> Only check the "Thumbnail" box and then click on "OK" button.


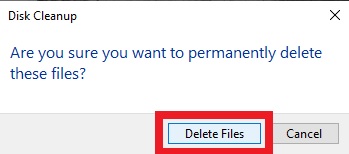
> After that click on "Delete Files" button. This will delete all thumbnail cache.


> If this fix still don't work's for you then move to 5th fix.


Fix 5: Use Command Prompt to Delete Thumbnail Cache.

> Open "Command Prompt" as administrator.


> After that execute below mentions commands one by one and press "Enter" key after each command to start it's execution.

> Note : Don't close the text file on which you have commands to execute, Because when you execute the 1st command it will disable windows explorer, So don't minimize the file on which you have commands or this this article, So that you can easily copy the next command. 

Command 1 : taskkill /f /im explorer.exe


> Command 2: del /f /s /q /a %LocalAppData%\Microsoft\Windows\Explorer\thumbcache_*.db


> Command 3: start explorer.exe


> Once all commands execute successfully, Now you are good to go and this will definitely fix thumbnail not showing issue in windows 10.


> Watch Video Tutorial : Fix Thumbnail Not Showing Issue Windows 10


Saturday, June 5, 2021

How to Fix Windows 10 Apps Not Opening Problem | 4 Working Fix

 How to Fix Windows 10 Apps Not Opening Problem | 4 Working Fix


In this article of "How to Fix Windows 10 Apps Not Opening Problem", I will share 4 simple and working solutions through which you can easily fix this apps not opening or working problem in windows 10.


SOLUTIONS TO FIX WINDOWS 10 APPS NOT OPENING ARE:


Fix 1: Run SFC Scan Command.

> Open CMD Prompt as Admin & then type command "sfc/scannow" and then press "Enter" key to start the execution of the command.


> This command take few minutes to ends it's execution successfully, So be patient.

> If this fix does not work for you then move to 2nd fix.


Fix 2: Run Windows PowerShell Command.

> Open "Windows PowerShell" as Administrator and then type command :
Get-AppXPackage | Foreach {Add-AppxPackage -DisableDevelopmentMode -Register "$($_.InstallLocation)\AppXManifest.xml"}


> And then press "Enter" key to start the execution of the command.

> Once command executed ends, Restart your PC or system. After that Try to open any windows app. If it work's then Ok otherwise move to 3rd fix.


Fix 3: Registry Editor Fix.

> Open Registory Editor, Right-click on each "HKEY_ETC" & then click on "Permissions".

> Make sure that "ALL APPLICATION PACKAGES" "Read" box is checked.


> Once done... Restart your PC.

> If this fix still not work's for you then move to 4th fix.


Fix 4: Run DISM Commands.

> Open Command Prompt as Administrator & then type command : 
    DISM.exe /Online /Cleanup-image /Scanhealth

> And then press "Enter" key to start the execution of the command.


> After that execute another command :
    DISM.exe /Online /Cleanup-image /Restorehealth
    
> And then press "Enter" key to start the execution of the command.


> Once both command execute successfully... Restart your PC/System.

> Watch Video Tutorial : Fix Windows 10 Apps Not Opening Problem


Wednesday, June 2, 2021

How to Fix Windows 10 Brightness Control Not Working or Brightness Slider is Missing

 How to Fix Windows 10 Brightness Control Not Working or Brightness Slider is Missing


Many windows 10 user's are facing this type of problem like they are not able to adjust brightness from their PC or Laptop display settings because brightness control option or brightness slider option isn’t available on Windows 10.


So I am going to share two simple and working ways through which you can fix this brightness slider is missing in windows 10.

Solutions to Fix Windows 10 Brightness Control Not Working or Brightness Slider is Missing:


Fix 1: Update the "Display Drivers".

Open "Device Manger", Expend "Display Adapters", then right click on the display driver which is install and then click on "Update Drivers".


After that click on "Search Automatically for Updated Driver Software".


This will start updating display drivers but make sure that your internet connection is "ON" or "Active".


Once windows successfully update display driver. Go to settings & check for "Brightness Settings" in display.


If the Windows 10 brightness control issue still persists then try 2nd fix.


Fix 2: Change "Monitor Drivers".

Right click on "Start Button" and then click on "Device Manager".


Expend the "Monitors", Right click on monitor driver and then click on "Update drivers" option.


Click on "Browse my computer for driver software".


Click on "Let me pick from a list of available drivers on my computer".


Here you need to select the "Generic Pnp Monitors" model and then click on "Next" button.


This will install o set "Generic PnP Monitors" model to your "Monitor Driver".


Once installed, Go to windows settings or notification & there you see brightness slider and settings in display settings.


And now you can see and control the brightness of the windows 10 pc/laptop.