Thursday, December 7, 2017

How To Remove Groove Music From Windows 10 ?


How To Remove Groove Music From Windows 10 ?

If you want to remove or uninstall windows 10 default app called groove music then you are reading the right article.


In this article i will tell you very simple way to uninstall windows groove music app from windows 10.

Step 1 : Open "Windows Powershell" as admin.

Step 2 : Type command : Get-AppxPackage -AllUsers and hit enter key.

Step 3 : After that find "Zunemusic" and copy packagefull name.

Note : In windows 10 zunemusic also known as groove music.

Step 4 : Now type command : Remove-AppxPackage <PasteherePackageFullName> and then hit enter key.

Note : Here <PasteherePackageFullName> is the groove package name which you copy.

Once you hit enter key, It will start uninstalling process of groove music, once process ends just restart your pc...

Watch Video Tutorial


Friday, December 1, 2017

How To Repair Start Menu Not Working In Windows 10


How To Repair Start Menu Not Working In Windows 10

In this article i will show you very simple and easy way through which you can repair start menu not working in windows 10.


1 > Open Command prompt as admin.


2 > Type : powershell and then hit Enter Key.


3 > After that execute below mention cmd and hit enter key to      execute it...


Click Here to Get Windows PowerShell Commands which i use in this video tutorial...


Watch Video Tutorial


Tuesday, November 28, 2017

How to Restore Windows Photo Viewer in Windows 10 ?


How to Restore Windows Photo Viewer in Windows 10 ?


Code :

Windows Registry Editor Version 5.00

[HKEY_CLASSES_ROOT\Applications\photoviewer.dll]

[HKEY_CLASSES_ROOT\Applications\photoviewer.dll\shell]

[HKEY_CLASSES_ROOT\Applications\photoviewer.dll\shell\open]
"MuiVerb"="@photoviewer.dll,-3043"

[HKEY_CLASSES_ROOT\Applications\photoviewer.dll\shell\open\command]
@=hex(2):25,00,53,00,79,00,73,00,74,00,65,00,6d,00,52,00,6f,00,6f,00,74,00,25,\
00,5c,00,53,00,79,00,73,00,74,00,65,00,6d,00,33,00,32,00,5c,00,72,00,75,00,\
6e,00,64,00,6c,00,6c,00,33,00,32,00,2e,00,65,00,78,00,65,00,20,00,22,00,25,\
00,50,00,72,00,6f,00,67,00,72,00,61,00,6d,00,46,00,69,00,6c,00,65,00,73,00,\
25,00,5c,00,57,00,69,00,6e,00,64,00,6f,00,77,00,73,00,20,00,50,00,68,00,6f,\
00,74,00,6f,00,20,00,56,00,69,00,65,00,77,00,65,00,72,00,5c,00,50,00,68,00,\
6f,00,74,00,6f,00,56,00,69,00,65,00,77,00,65,00,72,00,2e,00,64,00,6c,00,6c,\
00,22,00,2c,00,20,00,49,00,6d,00,61,00,67,00,65,00,56,00,69,00,65,00,77,00,\
5f,00,46,00,75,00,6c,00,6c,00,73,00,63,00,72,00,65,00,65,00,6e,00,20,00,25,\
00,31,00,00,00

[HKEY_CLASSES_ROOT\Applications\photoviewer.dll\shell\open\DropTarget]
"Clsid"="{FFE2A43C-56B9-4bf5-9A79-CC6D4285608A}"

[HKEY_CLASSES_ROOT\Applications\photoviewer.dll\shell\print]

[HKEY_CLASSES_ROOT\Applications\photoviewer.dll\shell\print\command]
@=hex(2):25,00,53,00,79,00,73,00,74,00,65,00,6d,00,52,00,6f,00,6f,00,74,00,25,\
00,5c,00,53,00,79,00,73,00,74,00,65,00,6d,00,33,00,32,00,5c,00,72,00,75,00,\
6e,00,64,00,6c,00,6c,00,33,00,32,00,2e,00,65,00,78,00,65,00,20,00,22,00,25,\
00,50,00,72,00,6f,00,67,00,72,00,61,00,6d,00,46,00,69,00,6c,00,65,00,73,00,\
25,00,5c,00,57,00,69,00,6e,00,64,00,6f,00,77,00,73,00,20,00,50,00,68,00,6f,\
00,74,00,6f,00,20,00,56,00,69,00,65,00,77,00,65,00,72,00,5c,00,50,00,68,00,\
6f,00,74,00,6f,00,56,00,69,00,65,00,77,00,65,00,72,00,2e,00,64,00,6c,00,6c,\
00,22,00,2c,00,20,00,49,00,6d,00,61,00,67,00,65,00,56,00,69,00,65,00,77,00,\
5f,00,46,00,75,00,6c,00,6c,00,73,00,63,00,72,00,65,00,65,00,6e,00,20,00,25,\

00,31,00,00,00

Wednesday, November 22, 2017

How To Reinstall Windows 10 Default Apps using PowerShell


How To Reinstall Windows 10 Default Apps using Powershell

Because sometime windows 10 default apps are not opening or not working properly that's why windows 10 user's uninstall them.


If you uninstall any default apps in windows 10 and now you want to reinstall them back then read this article till because in this article i will tell you very easily way to reinstall all default apps in windows 10.

So let's start, follow my below mention steps...

Step 1 : Search for "Windows PowerShell" and open as administrator.


Step 2 : Now you just need to execute below mention command in the windows powershell.

Command is : Get-AppXPackage | Foreach {Add-AppxPackage -DisableDevelopmentMode -Register "$($_.InstallLocation)\AppXManifest.xml"}


Just copy that command, paste in powershell and hit enter key to execute it...

This command will start reinstalling all the default apps of windows 10 again.

Once this command ends execution, restart your PC.

When you login, you should find all your missing default apps available in windows 10.

Watch Tutorial


Sunday, October 15, 2017

How To Find Your Windows 10 Product Key on PC


How To Find Your Windows 10 Product Key on PC


In this article I will show you very easy way to find your windows 10 (All Versions) Product key on PC after Upgrade.


For that you just need to download a free software called "Nirsoft ProduKey".


Click here to Open "Nirsoft ProduKey" Website to Download Software for FREE.

By using this free software you can easily find product key of your windows 10 Pro/Home etc. after upgrading.


Monday, October 9, 2017

Fix "This Site Can’t Be Reached" Error in Windows 7/8/10


Fix "This Site Can’t Be Reached" Error in Windows 7/8/10

In this article i will show you very easy and quick way through which you can fix "This Site Can’t Be Reached"Error in Windows 7/8/10.


Steps to Fix "This Site Can’t Be Reached"Error in Windows 7/8/10 :

Step 1 : Go to "Control Panel".


Step 2 : Click on "Network and Internet".


Step 3 : Click on "Network and Sharing Center".


Step 4 : Click on "Change Adapter Settings".


Step 5 : Now right-click on "Ethernet" or "Wi-Fi" internet connection (Active Internet Connection) and then click on 
"Properties".


Step 6 : Select "Internet Protocol Version 4(IPv4)" and then click on "Properties".


Step 7 : Now first select "Use following DNS Server Addresses" radio-box, then type "8.8.8.8" as "Preferred DNS Server" and "8.8.4.4" as "Alernate DNS Server".


In the last click on "OK" button to save changes...

Watch Video Tutorial


Saturday, September 30, 2017

How to Clear all Cache Memory on Windows 10


How to Clear all Cache Memory on Windows 10

Cache stored on Windows 10 retards your PC or laptop from working with its efficiency.

Due to this cache your PC becomes slower, hangs time and again, starts in a longer period of time.

So by clearing all cache from your PC, make your computer work smoother and faster.

Steps to Clear all Cache from your PC :

Search for "Disk Cleanup".


Select the drive which you want to clean and hit "OK".


It will start calculating how much space you get after cleaning up the drive.


Now check all check-boxes and then hit "OK" button.


After that click on "Delete Files" button.


Once you hit "Delete Files" button, it will start deleting all temporary files and cache from your PC.

                                  Watch Video Tutorial

How To Fix Google Chrome Error 0xc0000005


How To Fix Google Chrome Error 0xc0000005 or "The Application Failed to Initialize Properly"

When you get this error code 0xc0000005 or "The application failed to initialize properly.

To fix this google chrome error code (0xc0000005) :

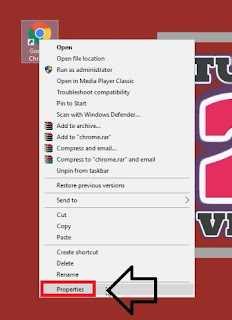
Right click on Google Chrome desktop shortcut and then click on "Properties".


Under "Shortcut" tab, Click on "Target Box".


After that navigate to the end, hit a space and type "-no-sandbox".


Once you done that hit "Apply-OK" button to save changes.

That's it... This will fix that google chrome error code.

Watch Video Tutorial


How to Fix Your Connection is Not Secure on Firefox


How to Fix Your Connection is Not Secure on Firefox

This error message "Your Connection is Not Secure" or  SEC_ERROR_EXPIRED_ISSUER_CERTIFICATE occur due to incorrect date and time of your PC. 


So just you need to set your system clock to today's and set correct date and time.

Go to Date and Time Setting and then set the correct date and time of your PC.


Once you set correct date and time of your PC, just browse the website, Now that website will open without displaying any error message.

Watch Video Tutorial 


Sunday, September 24, 2017

How To Fix Windows 10 Shutdown Problems ?


How To Fix Windows 10 Shutdown Problems ?

In this article i will show you two methods in regards to resolving issues that may result from Windows 10 having issues shutting down/turning off correctly...

Method 1 : Go to "Power Options".


Now turn-off both options under "link State Power Management" and then click on "Apply-OK" button.


Once you done that just reboot your pc/laptop...

If this method does not works for you then apply 2nd method...

Method 2... Open Command Prompt (As Admin).


Once cmd opened, Type cmd "powercfg -h off" and press enter key.


Once command executed successfully, after that just reboot your PC/laptop.

Video Tutorial


How to Fix Google Chrome Not Working Issue ?


How to Fix Google Chrome Not Working Issue ?

> Hi guys... If your Google Chrome browser not working Not Opening then watch this video till to fix this issue...

> Follow my shown steps...

> Go to "File location of Google Chrome Browser".


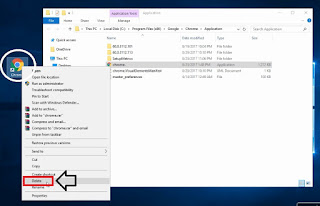
> Just right-click on Chrome and hit Rename.


> After that add any character,symbol or letter after chrome.


> Once you done that delete desktop shortcut of chrome and create new one.


> That's it, Open chrome and now it will work properly without any problem or issue... 

Video Tutorial


Thursday, September 14, 2017

How to Repair Microsoft Edge in Windows 10 ?

How to Repair Microsoft Edge in Windows 10 ?

If Microsoft Edge not working then you just need to re-install 
Microsoft Edge back to a clean and factory state...


So let's start... Follow my steps...

Steps to Repair or Reset Microsoft Edge Browser in Windows 10 :

1st Step : Open RUN (WIN + R).

2nd Step : Type "%USERPROFILE%\AppData\Local\Packages" 
 into the box and after that click on "OK" button.

3rd Step : Now find the folder named as 
"Microsoft.MicrosoftEdge_8wekyb3d8bbwe" and delete it.

4th Step : Restart the computer/laptop.

5th Step : Once PC restarts, Search for "Windows Powershell", 
Right-click on it and choose Run as administrator.

6th Step : Once the PowerShell interface comes up, paste the 
command "Get-AppXPackage -AllUsers -Name Microsoft.MicrosoftEdge | Foreach {Add-AppxPackage -DisableDevelopmentMode -Register "$($_.InstallLocation)\AppXManifest.xml" -Verbose}".

7th Step : Press enter key to execute the command.

In the last just restart your pc/laptop, when command 
execution is completed...

That's it... Through this you can repair/Reset Microsoft Edge

 Browser in Windows 10, if it does not works properly...

>>>>> Click Here to Watch Video Tutorial <<<<<<


Monday, March 6, 2017

How To Download Facebook Video Without Any Software

How To Download Facebook Video Without Any Software

As you all know Facebook does not give you an built-in option to download any video from it that's why you use third party video down-loader or software to download video from Facebook.

But in this article i will tell you very easy way of downloading any video from Facebook with using any software.


Follow the below mention steps to download video from Facebook :

Step 1: Sign-in into your Facebook Account.

Step 2: Go to the video which you want to download, right click on it and select "Show Video URL".

Step 3: It will show you video url just copy (Ctrl+C) whole url of video.

Step 4: After that open "New Tab" and paste video url.

Step 5: Now here just replace "www" to "m" from the video url and hit enter key.

Step 6: Play the video, while it's playing right click on it and select "Save Video As" option.

Step 7: Save As windows open in front of you, just select the path where you wan to save it, also name it and in the last click on "Save" button.

This will start downloading process and when process ends you will find that downloaded video file at the place where you save it.

So friend's through this simple method you can download any Facebook video without using any

If you want to watch video tutorial of "How To Download Facebook Video Without Any Software" then click on below mention link...


Thanks... Don't forget to Share...


Sunday, March 5, 2017

How to Extract Audio from Video File using VLC Media Player

How to Extract Audio from Video File using VLC Media Player

As you know VLC media player is use to player any audio or video file but many of you don't know that VLC media player also use to convert files from one format to another.

So in this article of "How to Extract Audio from Video File using VLC Media Player" i will tell you very simple steps through which you can convert any video or mp4 file into audio or mp3 file just by using VLC media player for free.


Steps to Extract Audio From Video File Using VLC Media PLayer:


Step 1: Open VLC Media Player.

Step 2: Click on "Media" and then Select "Convert/Save" Option.


Step 3: After that Click on "Add" button to add the video file from which you want extract audio and             then Click on "Convert/Save" button.


Step 4: Now Select "Audio - Mp3" profile from the drop down list of Profiles.


Step 5: Give "Destination Path" where you want to save that audio file.


Step 6: In the last just Click on "Start" button. This will start converting process and when process                 ends you will find that audio from you save it.


So friend's with the help of VLC media player you can convert any video file into audio without using any converter or software.

If you want to watch video tutorial of "How to Extract Audio from Video File using VLC Media Player" then just Click on below mention link.


Thanks... Don't forget to Share...


Friday, March 3, 2017

How to Change the Default Languages in Google Chrome

How to Change the Default Languages in Google Chrome


Hi... In this blog of "How to Change the Default Languages in Google Chrome" i will tell you step by step how you can change language in google chrome web browser.


Steps to Change the Default Language in Google Chrome :

Step 1: Open Google Chrome Web Browser.

Step 2: Click on three parallel dots which is present on upper right side of chrome windows.


Step 3: From the drop down list click on "Settings".


Step 4: Under Default Browser, Click on "Show Advanced Settings".


Step 5: Click on "Languages and Input Settings" button which is present under Languages option.


Step 6: Now first you have to add any language in which you want to change chrome's default language. By default it set to "English (United State)". You can add other language just click on "ADD" button.


Step 7: Select any language which you want and click on "OK" button.


Step 8: After that drag that language to top and then click on "Display Google Chrome in this                         Language". In the last just click on "Done" button.


After hitting "Done" button restart your google chrome browser. 

If you want to watch video tutorial of "How to Change the Default Languages in Google Chrome" then click on below mention link...

Thanks... Don't forget to Share...